Sunday, 9 December 2012

Creating my TANK

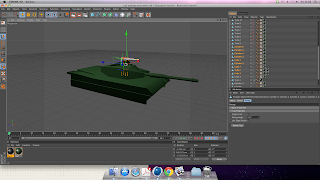
How I made my tank was by using a cube and re sizing it and scaling it to how I wanted it. I then used the extrude tool to change the shape of it and changed the thickness and dimensions of the cube as shown below. After each step I coloured the tank by clicking on the material tab and made the tank green. I also added a new material which allowed me to add some reflection and a material type so I made the tank metallic and also slightly blocky giving it a metal like feel.


In the next picture I then used another cube and re sized it using the extrude tool. I then used the knife tool to make more areas for me to edit allowing me to get into tight gaps and remodel certain parts of the tank in high detail.


After applying the tank base I then made the turret of the tanks cannon by using a tube and aligning it to fit the tank accurately. I used a tank as a reference to get accurate results but modified the tank in my own futuristic version of a tank. The picture below shows me lining up the tank cannon to the tank base.


After adding the turret to the tank I then added extra adjustments to the tank turret making it more detailed and realistic.


After making the turret I then made the mounted machine gun on the tank using a cube and re sizing it by extruding it and scaling it to fit. For the barrel of the gun I used a Tube and scaled it to fit.


When the gun was then made I then made the tracks by drawing them by using a spline tool to create my own tracks rather than using shapes. I then used a tab to allow me to see from all perspectives to help me get more accurate result when drawing with the spline tool.


After I created the belt tracks I then added some extra detail by creating the wheels of the tank by using tubes. I then used the tool extrude and scaled them to make the inner part of the tube go in on itself and the outline more bold making the wheels look like rims with no tires as shown in the picture below.


After the tank had wheels it was time to add a background and an environment for the tank. I then also added a light source for the tank making the tank more realistic. I then made a background and added hills, dents, bumps, cliffs and even holes in the ground to make the terrain very realistic.


Making a Spaceship in Cinema4D

In this project I was asked to make a plane.

So Instead I wanted to make something more difficult and REALLY challenge myself and make a spaceship. Below I will show you a step by step on how I made this spaceship shown below.


Starting with the basics I had to make the base of the spaceship so I used a cube and used a tool called extrude. This allowed me to stretch and add other cubes to the cube allowing me to edit the other shapes in time if I wish to.


After using the extrude tool a few times and shaping it to how I wanted it by using the scaling tool and rotating how I wanted the wings to go and how thin I wanted the wings or the base I was then left with a plane/spaceship shape as shown below.


After I was then happy with the base of the Ship I then added a HYBER NURB. This allowed me to make my ship smooth and have a futuristic looking effect and not a blocky retro tank. As you can see in the picture below you will then see me editing adding a windshield on the ship and tinting it yellow. This was made by adding a cube, Hyper Nurb and re sizing it to make a oval looking shape. I then went to the Material Tab and clicked colour and selected yellow and also creating a reflection by also clicking the reflection tab and lowering the brightness slightly. When I was happy with these settings I then applied it to the ship shown in the picture below.


After I made the Base and the windshield I then added lights/flares to the edges of the wings to make it look like jet engines. I did this by clicking on the light tab as shown in the picture below and positioned it where I wanted it.


The next step I then made a background. How I did this was by going to the Material tab again and applying it as a background. As shown below.


Finally after applying the background I decided to go beyond the idea of just making a spaceship to boost my grade I decided to add rocket pods to my spaceship in fine detail I created this by adding a cylinder and used the selection tool to highlight the circle on the top of the cylinder and cut it out. I then added other cylinders and placed them into the pod and added cone tips onto the cylinders creating a rocket pop. The picture below will show you the rockets.


Making a Glass Bottle and Goblet

In this project I had to make a Glass Bottle and Goblet. How I achieved this was by using a spine tool and hand drawing my outline of a bottle. To get the correct figure I opened up a tab window in the top right corner of my project to open 4 different angles for me to see where I will link the line together.


After I made the outline of the Goblet and the Glass bottle I then added a Lathe NERB. This gave me the rounded edges and helped me link my object precisely to how I wanted it. The picture below will show you where to find the Lathe NERB.


After adding colour in the material box and a light source on the menu bar at the top with the white shape the final render should look like this.


Making an iPod

For this task in 3D modelling we were asked to create an Ipod in Cinema 3D. Following a tutorial this is how I achieved my Ipod in the picture below.


How I achieved this Ipod was by making a base layer using a cube shape and changing it to size. How I made my Ipod have curves around the edges giving it a smooth finish was by clicking the object tab and by ticking the Fillet box and fill in the fillet radius and fillet subdivision to the size I liked as shown below.


After I finished making the base of my Ipod I then changed the colour of it by clicking on the materials editor and clicking the tab NEW MATERIAL. When on this tab it allows you to add various effects such as colour, reflection, fog, material type, transparency and more. The screen shot below shows you what the tab looks like when opened.
 

When I completed the colour change and reflection I then wanted to add a texture making an Ipod screen so I opened up the texture tab and then looked for texture. I then clicked the drop down menu and looked for the image I wished to use. As you can see in the screen shot I used Ipod menu.JPG


After applying the two textures I then added some extra detail out of my own will to make the Ipod more realistic was to add a headphone slot. An Ipod without a head phone slot is not an Ipod right? This was done by selecting a tube on the shape selector and adjusting it to size by using the size adjustments on the right panel as shown in the screenshot below.

After making the Ipod headphone slot I then made a floor for the Ipod to rest on. This was easily made by make a "Plane" Object and positioning it where I wanted it.

After making the floor you now need to add a light source. On the top of the menu bar you will see a white star looking shape. Click that and you will be given a light to position anywhere on your work area. As you can see I am positioning it on the right.


Finally after I made the light source I rendered my work and this was the final result. A realistic Ipod created in Cinema4D.